DIY napkin rings with Cricut Explore Air 2
June 12, 2017
Party details won't go unnoticed when they're this pretty and sparkly! Follow along and learn how you can create an easy DIY napkin ring with a Cricut Explore Air 2.
This is a sponsored conversation written by me on behalf of Cricut. The opinions and text are all mine. #cricut #PartyWithCricut #ad
Supplies I used for this project:
Once you get your supplies set up, head over to the NEW Cricut Design Space! There are so many wonderful designs you can choose from. I get so much inspiration when I visit the site.
In the search, I typed napkin ring. A few images showed up, and I picked the design I wanted, and then clicked on the image to highlight it.
Once your design is selected, click on insert images towards the left of your screen. This will add the image onto your mat.
From here, you can also choose which layers you want to print. For example, I didn't what to print the design that was shown on top of the napkin ring.
Once you establish what you want to print, and set the sizing of your image; inches high and across, you'll need to choose from the options available on the side, such as the size of your paper, etc. Then click the green go button towards the bottom of your screen.
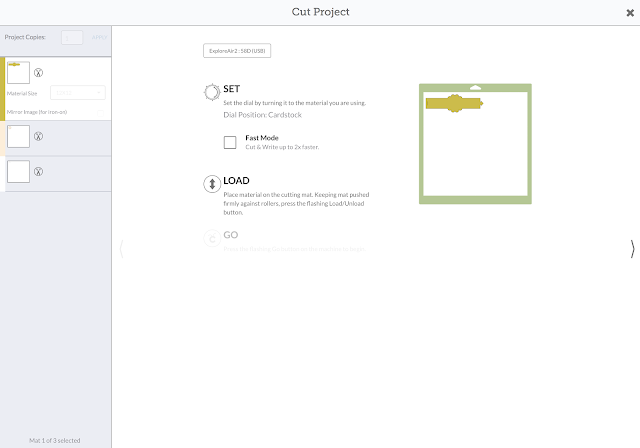
Set your machine dial to the material you will be cutting on. For example, I used cardstock for my napkin rings. Turn your machine on and get ready for the magic to happen!

After hitting the go button, this screen will pop up. From here you'll need to load your machine.
Set the cardstock onto the cutting mat. Make sure the edges of your material are lined up straight within the lines of the cutting mat. Set the cutting mat and cardstock onto the machine and hit the load button. Once the paper loads, push the cut button - your machine will then start the cutting process. The Cricut Explore Air 2 works so fast! When the cut job is complete, hit the load button again to unload the cutting mat.
When you start to peel the extra cardstock away from your design, it might work best with one of your tools. I especially loved how the napkin ring included a perfectly cut slit and tab for when it came time to assemble the rings - the good people at Cricut thought of everything!
The napkin rings are so pretty! They are so easy to create and will look great at your next party, event, or gathering! I hope you enjoyed my tutorial.
For a chance to win your very own Cricut Explore Air 2, see my last Cricut post Easy ways to personalize your Quinceanera. I'm sharing where to enter - Good Luck!
This experience is based strictly on my opinion. Others may have a different opinion or experience with the product listed above. I was provided the sample free of charge by the company or PR agency and I have given my honest opinion.


0 comments