


Easy party tips for a festive Halloween party!
September 11, 2022Halloween is the perfect time to celebrate with a Halloween party! My children look forward to getting together with their friends to celebrate the season! Games, treats, and lots of fun!
Do you put together a Halloween party? I've got some fun and easy ways to show you how to celebrate! Follow along as I share my party decor, spooky treat cups, and a candy corn ring toss game!
With a variety of Mars candies, and Walmart, I'll show you how easily you can create a party for Halloween.


Pin for later.


With a variety of Mars candies, and Walmart, I'll show you how easily you can create a party for Halloween.
Throwing parties is one of my favorite things to do! Luckily my boys are always on board for a celebration! Balloons are one of the easiest ways to decorate for a party - they add so much color to any gathering. My favorite is the balloon garland. They are super easy to make and you can add in your own personal touch to every one.
Have you ever tried making a balloon garland? I've got some easy steps to help you create your very own!
A good rule of thumb I like to follow is this: Fill 18 - 20 large balloons, and 48 - 55 small balloons. As you go along, you may find that you need to add more, and use less balloons. It all depends on your own style!
You'll need:
Balloons
Decorating strip or balloon tape
Balloon pump
You can use balloons in assorted sizes. I like using 12" and 9" balloons.
Inflate balloons to the desired sizes, tie the ends with a knot and set them aside. I like to create a big pile of balloons so I can easily see what I have to choose from, when I start adding them to the balloon strip.
Once you're done inflating all the balloons, step back and see what you've accomplished! That's a lot of balloons. Now you're ready to start creating your garland!
I don't cut the balloon strip until I'm finished adding all of the balloons. Pull out the strip and start by adding balloons and pulling the knot through the largest hole on the balloon strip.
From here, you'll need to skip a hole while alternating the direction you add the other knotted balloon.
Continue with this pattern until your balloons are gone, or until you've reached the desired length of the garland.
The garland is generally lightweight. I easily attached this to my wall with thin twine and duck tape. You can attach the garlands to just about anything! I like to add it over my main party table, with uneven sides.
From here, you can choose to add more decor to the garland, or leave as is. I decided that I wanted to add a bit more Halloween decor to coordinate with my party.
I purchased a really cute Halloween banner that I wanted to add to it. I ended up cutting it into pieces and attached to the balloons, with tape.
See how much fun a balloon garland adds to your party?!
Now that your party is decorated, it's time to think about party games! The possibilities are endless for fun Halloween themed games.
Create a friendly competition with a ring toss game. To make it Halloween themed, I created a candy corn cone toss!
Here is what you need to create this festive candy corn toss game!
Small caution cones
painters tape
spray paint
drop cloth
Start by taping off sections of the cones. These taped off areas will represent the colored stripes of a candy corn.
It isn't exactly easy to tape off straight lines on a curved cone, but just try your best.
Now you're ready to start spraying!
Before the paint dries completely, start to carefully peel of the taped areas.
Let the candy corn toss games begin!
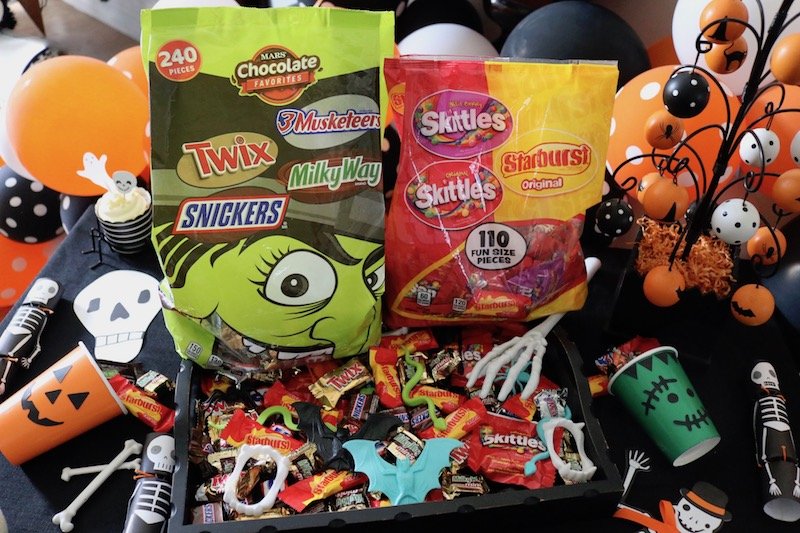
Speaking of candy, Mars has a great variety of Halloween themed candy! You can head over to your local Walmart for a great selection.
Send your party guests home with a spook-tacular party favor. You can easily create these darling Halloween cups that are filled with all sorts of candies!
Set them out on the party table for your guests to grab on their way out. They also make cute Halloween decor for you party table!
Here is how you can make them yourself!
Supplies needed:
Colored paper cups
black cardstock
white cardstock
glue/glue stick
cutting machine or scissors
With my cutting machine, I created some fun bat shapes, eyes, stitches and hair for Frankenstein, and jack-o-lantern smiles.
Once the pieces were cut out, I started with the bat cups.
I applied a glue stick to the bat's face and body. Then I attached them to the backs of the black paper cups. This gave the illusion that the cup itself had bat wings!
For the pumpkin cups, I simply added the jack-o-lantern smiles, nose, and eyes, to the front of the orange cups.
I repeated all of these steps when it came time to make my ghost and Frankenstein cups. Very easy!
Get creative by displaying SKITTLES® Candy and STARBURST® Fruit Chews Variety inside of pumpkin, bat, ghost, and Frankenstein cups! How about the Witch bag Chocolate Variety Mix Stand-up Pouch featuring 240 pieces of chocolate.
Make your Halloween party the center of attention with my easy tips and party ideas!
Happy Halloween!
This shop has been compensated by Collective Bias, Inc. and its advertiser Mars Wrigley Confectionery US, LLC. All opinions are mine alone. #FlauntYourHaunt #CollectiveBias #MarsKidsHalloweenParty
Pin for later.


0 comments